MRMO-CRT
Basic usage tutorial and tips!
I've formatted this in a FAQ form- if any new questions crop up, I'll try and answer them here!
Will this work on my PC?
-If Blender (at least version 2.93) works on your PC, then MRMO-CRT should work too. It is relatively taxing on the hardware, so having a dedicated video card definitely helps run it faster! Also try out the "Lite" version, as it should run much faster due to having only basic postprocessing effects.
I'm new to Blender, how do I render stuff?
-When you open the included .blend file in Blender, hit "F12" or go to "Render->Render Image" in the main menu on the top of the screen! After some time, Blender should produce the render of the current active camera.
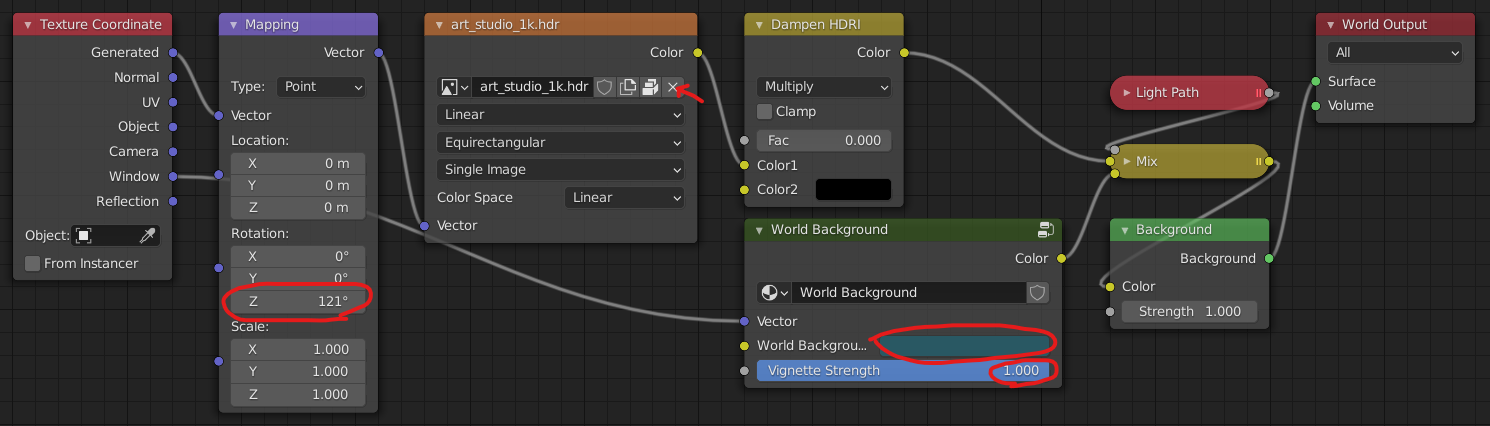
How do I change the input image?
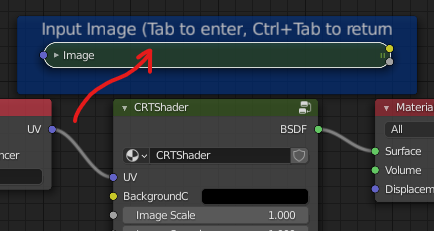
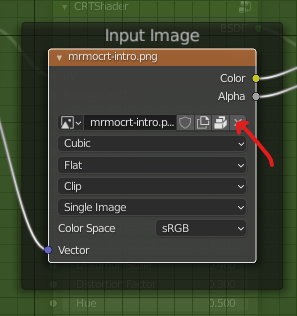
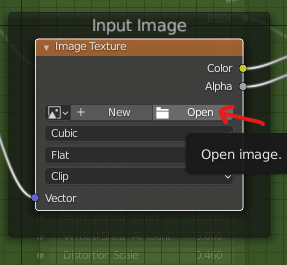
-When you open the included .blend file in Blender, in the "Shader Editor" area on the right side select the "Image" node (in the blue frame, the one that has the "Tab to enter" label on top of it). Hit "Tab" to enter the node group, and click the "X" icon in the "Image Texture" node (labeled "Input Image"). This will clear the pre-set image, and allow you to choose your own by selecting the "Open" option that should have appeared by now.
You can exit from the "Image" node group by hitting "Ctrl+Tab".
How do I change the render resolution?
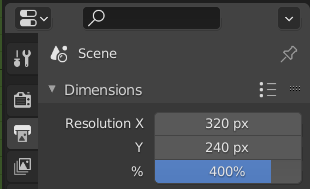
-In the "Properties" area on the right side, select the "Output Properties" tab (the one with the printer icon!). You can change the resolution of the rendered image, the percentage scale of the resolution (it's set to 400% of 320x240 pixels by default as of v1.01), as well as the file format and output directory if you're rendering an animation.
The image takes too long to render!
-If reducing the render resolution as described above is still not enough, you can try reducing the amount of render samples (this degrades the render quality somewhat). In the "Properties" area on the right side, select the "Render Properties" tab (the one with the photo camera icon!). There, under "Sampling", you can reduce the amount of render samples and try rendering to see how it affects the rendering time.

How do I change or disable the barrel distortion in the "Basic" version?
-The barrel distortion is done using two "Simple Deform" modifiers on the "display" object. Select the "display" object (either by clicking on it in the 3d viewport or in the outliner on the right side), and go to the "Modifier Properties" tab in the "Properties" area (the one with the wrench icon!). Here, you can change the amount of the distortion by modifying the "Factor" of the two modifiers, as well as disable the distortion by setting the numbers to 0 (or clicking on the Realtime "monitor" and Render "camera" icons of the modifiers to disable them).

Are there optimum image dimensions to stick to?
-According to my own test results, not really.
A bit more technical answer: the shader "fragments" the input image according to the "SM (shadow mask) Resolution" input, where the actual resolution is determined as 2 to the power of "SM Resolution" (so with SM Resolution of 9 the actual number of fragments is 2^9=512 horizontal "fragments"). this would mean that images with resolution higher than 512 pixels in width get "re-fragmented" down to 512 to fit the shadow mask resolution, which then displays the image "properly", without "fragmenting" the shadow mask phosphor RGB trios. If greater detail is needed, increase the "SM Resolution" to 10 or 11!.
The image appears too blurry or too sharp!
-Consider switching the image filtering modes in the "Input Image" Image Texture node between "Nearest", "Linear" and "Cubic", as they can give different results depending on the content of the input image texture. Also consider pre-upscaling your input image to 200% or 400% if it's a lower resolution image (e.g. pixelart). This can help it remain sharp when using "Cubic" and "Linear" image filtering modes.

"Deluxe" version-specific questions and tips:
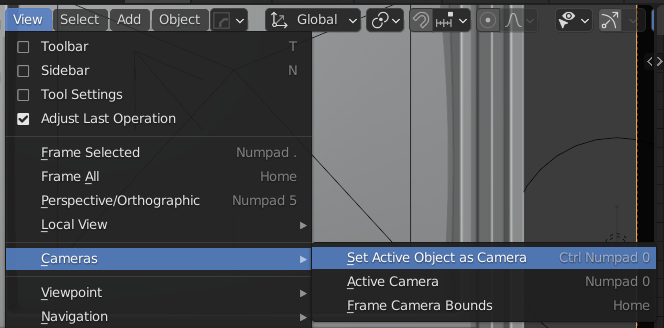
How do I change the camera preset?
-In the "Deluxe" version of MRMO-CRT, there are three pre-set cameras: "Camera_Full", that shows the "full" scene with the monitor, "Camera_Screen", that shows only the screen portion of the monitor, and "Camera_Detail", that zooms in on the image to show individual shadow mask phosphor RGB trios. In order to change the current camera for rendering the scene, select one of the three cameras in the outliner, and under the "View" menu of the 3D viewport, select "Camera"->"Set Active Object As Camera" (or hit "Ctrl+0"). The currently selected camera should become active.
Don't forget to select the "Display" object after you've changed the camera, so you can keep editing its material shader properties! :D
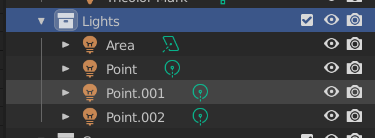
How do I modify the scene lighting?
-Apart from a few pre-set lights (that you can find in the outliner on the right side), the scene is lit using a HDRI image. In the bottom "Shader Editor-World" area, you can modify settings related to the scene "World", such as background color, vignette strength, location, rotation and scale of the HDRI image (Z Rotation probably being the most useful), or change the environment image to another HDRI image using the "Open Image" icon on the appropriate node.
Comments
Log in with itch.io to leave a comment.
How do you modify the barrel distortion in the deluxe version? I don’t see a modifier on Display
Yep, the deluxe version actually lacks the BD controls, as it was made back when I figured since it was being displayed on a "physical" model it would always be distorted in the same way (which is, of course, not true and is something I'd have fixed for the later processes!) and I'd just scale the display object itself along the Y axis and move it back towards the focal plane :)
You could do that as a quick method to flatten the display in "Deluxe", or, if you need to apply the distortion modification to the image without affecting the shadowmask, you could append the "Pincushion" node group from TriCRTops into the MRMO-CRT nodes- both approaches should be pretty easy to do, and I could make a quick how-to!